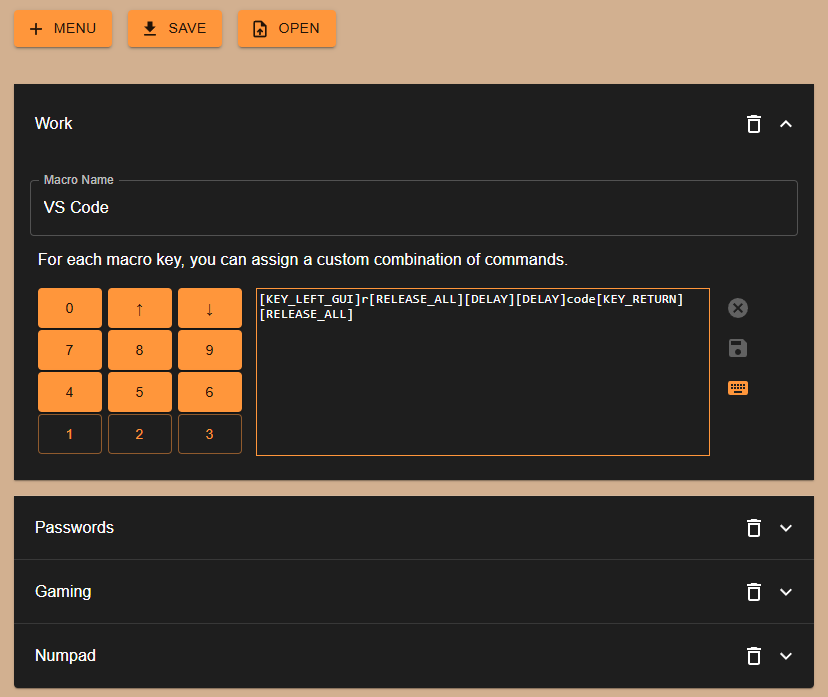
My daily job routine starts with the following steps: turn on the laptop, enter the password, open Jira, Teams and Gitlab, enter other passwords, open multiple VSCode windows with projects and run applications. All these tasks can be automated with a simple press of a button using the Macro KIKI keyboard, which allows configuring an unlimited number of commands and scripts.
Planning
The first step was choosing the microcontroller. Having already experience with Arduino boards, I chose an Arduino Pro Micro, due to its HID device emulation functionality (it can behave like a mouse or keyboard without requiring additional software installed on the target device). We'll see later that this choice wasn't the best due to its limited memory size.
From the beginning, I wanted the device usage to be as user-friendly as possible and the appearance to be pleasant. Thus, I added an OLED screen for the graphical interface, an encoder for menu navigation, and 12 programmable buttons.
Another important criterion established from the start was the ability to reprogram the keys without requiring driver installation or a dedicated application. The solution was implementing a web platform accessible from the browser that generates a configuration file. This file can be copied to a microSD card and inserted into the keyboard. An important aspect is that all generation is done locally, so sensitive data, such as passwords, never leaves the computer.
In the following sections, I will present each aspect of the keyboard one by one.
Keypad
The first step was developing a dedicated library for the numpad, as existing libraries either consumed too much memory or didn't allow simultaneous reading of multiple keys.
After completing the library, integrating it into a project is easy, following the example below.
const byte COLS = 3;
const byte ROWS = 4;
const byte MAX_NUMBER_OF_KEYS_PRESSED = 3;

byte rowPins[ROWS] = { 7, 8, 9, 10 };  // connect to the row pinouts of the keypad
byte colPins[COLS] = { 4, 5, 6 };      // connect to the column pinouts of the keypad

Keypad keypad(COLS, ROWS, MAX_NUMBER_OF_KEYS_PRESSED, rowPins, colPins);

void setup() {
  keypad.initKeypad();
}

void loop() {
  String pressedKeys = String(keypad.getPressedKeys());
  Serial.println(pressedKeys)
}
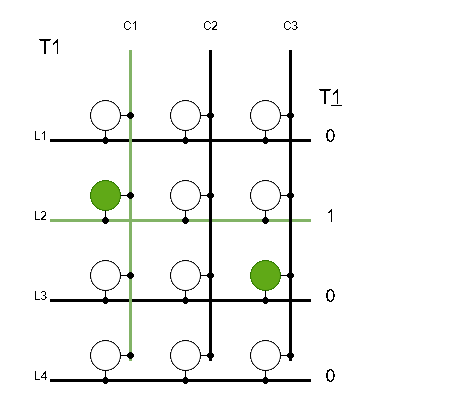
To efficiently use the microcontroller pins, I applied multiplexing, a suitable technique for matrix-arranged buttons. Thus, for a matrix with L rows and C columns, C pins are used as inputs and L pins as outputs (or vice versa). The microcontroller powers each column one at a time and reads the row values. The principle is illustrated in the following animation:
The implementation was slightly more complex because I wanted the buttons to be pressed simultaneously and to be able to read the order of pressing. Thus, I had to use a list to store the state of pressed buttons and a matrix to retain the state of all buttons at any moment.
char* Keypad::getPressedKeys() {
  for (int j = 0; j < _cols; j++) {
    for (int k = 0; k < _cols; k++) {
      if (k == j) {
        pinMode(_colPins[k], OUTPUT);
        digitalWrite(_colPins[k], LOW);
      } else {
        pinMode(_colPins[k], INPUT);
      }
    }
    for (int i = 0; i < _rows; i++) {
      int buttonSum = 0;
      for (int k = 0; k < 20; k++) {
        buttonSum += digitalRead(_rowPins[i]);
      }
      uint8_t buttonNewState = buttonSum == 0;
      if (buttonNewState != _keypadState[i][j]) {
        if (buttonNewState != 0) {
          addKeyInList(_pressedButtons, _keys[i][j]);
        } else {
          deleteKeyFromList(_pressedButtons, _keys[i][j]);
        }
        _keypadState[i][j] = buttonNewState;
      }
    }
  }
  return _pressedButtons;
}
To implement debouncing that doesn't block the thread and to avoid false values when reading pins, I read each signal 20 times and considered it LOW only if all readings were LOW. To avoid using pull-down resistors, I had to treat signals with inverse logic and activate the PULL_UP resistors integrated into the microcontroller.
The chosen buttons are mechanical keyboard switches, called Cherry MX Orange
To connect the buttons in rows and columns, I used uninsulated copper wires, which I separated with heat-shrink tubing to prevent rows from touching columns.
Software
The software was challenging from the start due to the diversity of components. Arduino Pro Micro has only 2KB RAM and 32KB Flash. The microSD card library needs about 512B for the read buffer, so the rest of the code had to be as efficient as possible.
The smallest library for OLED display is U8Glib, but its usage is more complex because a frame is rendered in multiple cycles (to use a smaller buffer).
The graphical interface consists of 2 layers. The first layer displays the menu titles (profiles) that the user can select by rotating the encoder. If the encoder is pressed, the menu will move to the second layer, displaying the descriptions of each key.
By far, the most complex part of the project was designing the data structure that would feed the graphical interface. Having so little memory available, almost all texts and variables are loaded into RAM one at a time to use as little space as possible. To avoid sacrificing speed by searching for information on the card, the designed data structure uses direct addressing techniques (similar to arrays) for frequently read texts and addresses, as well as pointer-based addressing techniques (similar to linked lists) for variable-length information with less frequent access.
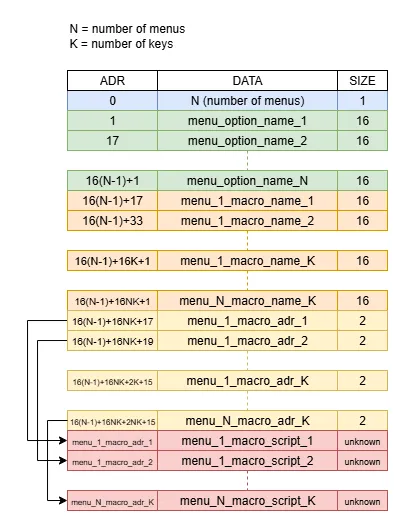
As shown in the image, the first byte of the file stores the number of available menus (N). A menu title can have 16 characters, so the next 16N bytes (green area) are for titles. We can directly address any title, knowing the size of a title and its offset. The next memory area (orange) is for key descriptions, for each menu in turn. The number of keys is fixed (12), so, like with titles, we can access any description directly based on the menu index and key index. The next memory area (yellow) is for macro script addresses. Because these scripts have variable size, I can't address them directly, but with these fixed-size pointers, I can jump directly to the offset where the script is located. Each address has 2B, and like descriptions, I have 12 keys * N menus. When using these pointers to reach the macro script area, the first 2 bytes of this area store the script length, so we know to stop reading before reaching the neighboring script.
int address = 1
              + NUM_OF_OPTIONS * MAX_SIZE_OF_MENU_TITLE
              + MAX_SIZE_OF_MACRO_TITLE * NUM_OF_KEYS * NUM_OF_OPTIONS
              + 2 * NUM_OF_KEYS * menuIndex
              + 2 * index;
To allow sending special keys like CTRL, SHIFT, or ENTER, I checked if the ASCII value of the character is greater than 0x80 and held the key pressed until receiving the value 0xFF. These values aren't random but are documented in the Keyboard.h library provided by Arduino. In the source code, you can see how from value 0x80, the keys are modifiers and special keys. For release, I used the value 0xFF because it's the highest and isn't used by any other key. To also introduce delay during commands, I used code 0xFE to mark a 200ms delay. This isn't variable, but the user can chain multiple delays for a longer effect.
void sendKey(byte key) {
  if (key == 0xFE) {
    delay(200);
  } else if (key == 0xFF) {
    Keyboard.releaseAll();
  } else if (key >= 0x80) {
    Keyboard.press(key);
  } else {
    Keyboard.write(key);
  }
}
3D Modeling
Throughout the modeling process, the device had several design variants. Initially, the keys were arranged horizontally, but the square appearance didn't satisfy me, so I rearranged them vertically. The first versions didn't have space for the microSD card, so I had to remodel this feature. Even the keys are custom modeled to perfectly match the case's appearance.
Links
The entire project is public and can be accessed on Github at the following links. If you liked it, don't hesitate to contact me for more information.
https://github.com/bodi-cmd/macro-kikihttps://github.com/bodi-cmd/macro-keyboard-ui
https://bodi-cmd.github.io/macro-keyboard-ui